
Instructor Resources
The Instructor role is an important part of EDGE Learning. Responsibilities for those with the EDGE Learning Instructor role may vary depending on the offering department, but most often, Instructors are those individuals who are facilitating or helping administer in-person Instructor-Led Trainings (ILTs) or Virtual Instructor-Led Trainings (VILTs) housed in EDGE Learning.
EDGE Learning Instructors must be provisioned through AccessFlow. If you or someone in your department needs access to the Instructor Role, please contact edge-learning@arizona.edu with the Instructor’s name, netID, and the name or course ID of the training you/they will be facilitating or helping to administer.
The following is a simplified example of the typical EDGE Instructor role workflow:
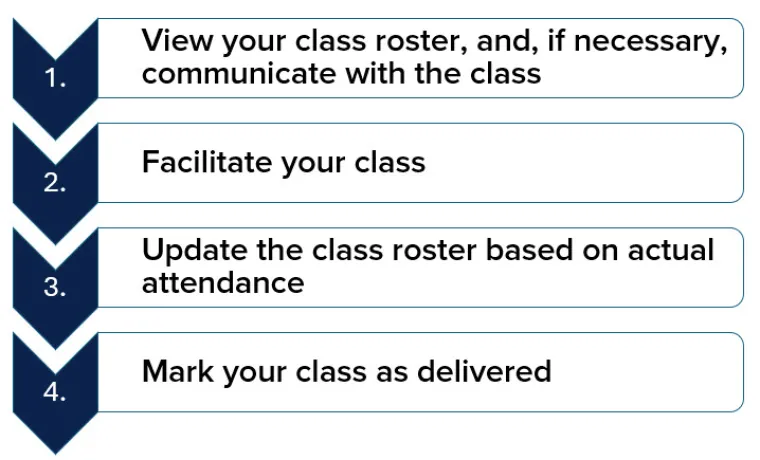
Expand each step below as needed for more information and/or step-by-step directions and screenshots.
Getting Started with the Instructor's Desk
The Instructor’s Desk is the main dashboard for the EDGE Instructor role. From here, you can manage your class roster, deliver your class, and mark attendance. The Instructor’s Desk has a few different views to utilize depending on your needs, including the default Instructor’s Desk view, Assessor’s Desk, Calendar View, and List View.
From the Instructor’s Desk you can launch your class, access your class roster, mark classes as delivered, and see your upcoming classes.
Follow these steps to access the Instructor's Desk:
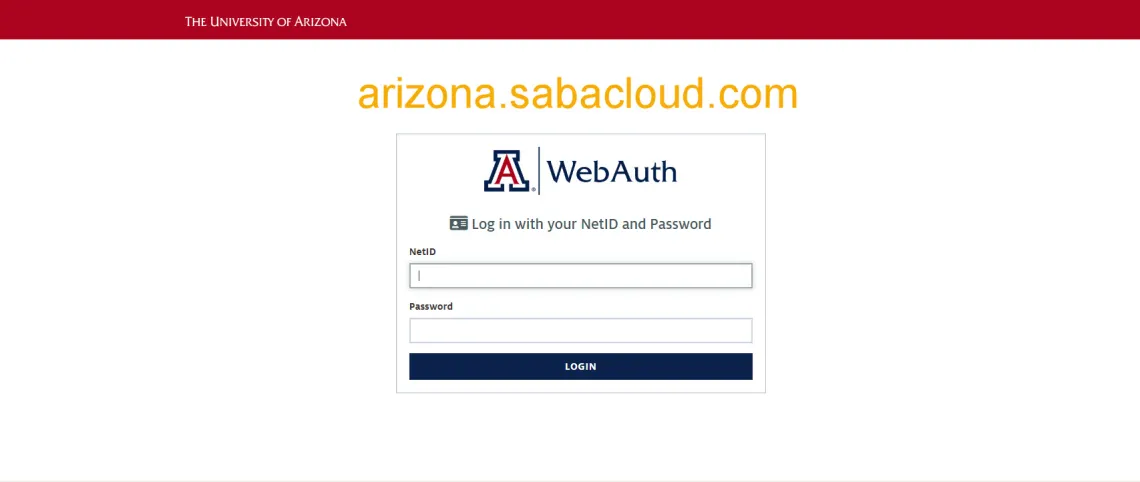
| Step 1: Visit EDGE Learning directly or select EDGE Learning from the UAccess Dashboard. Log in with your netID and password. | Image
Image

|
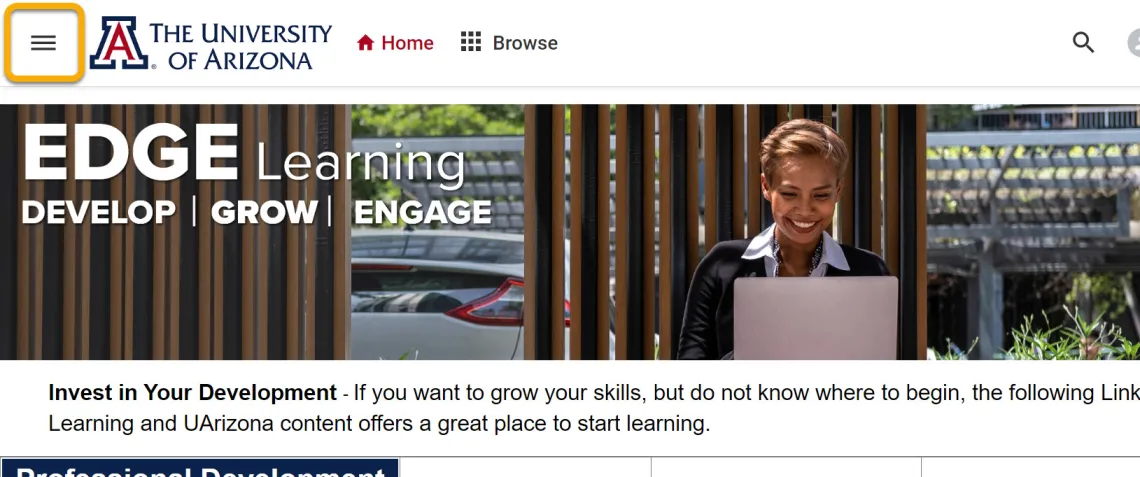
| Step 2: From the EDGE homepage, select the Navigation Button. | Image
|
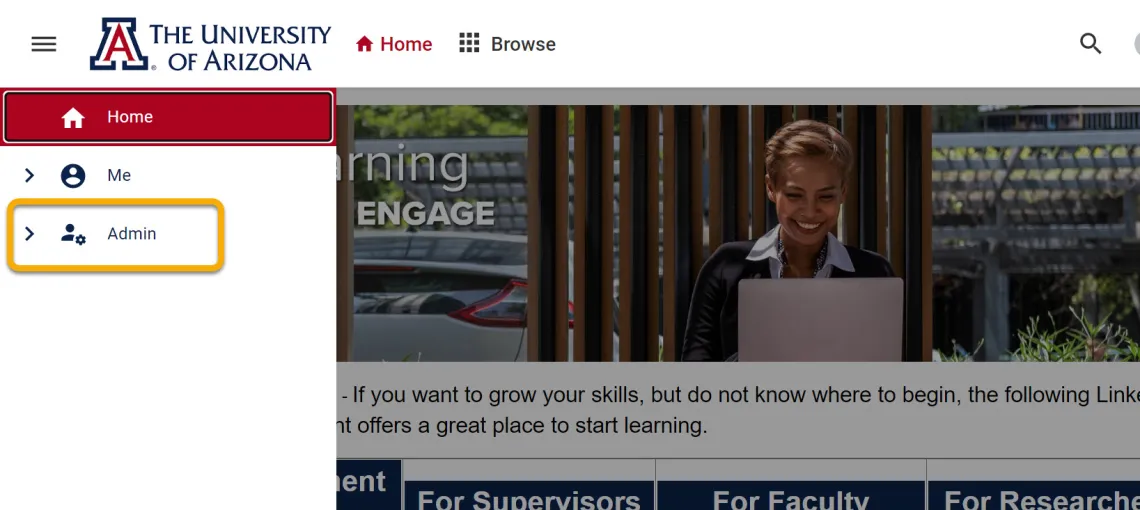
| Step 3: Select Admin. | Image
|
| Step 4: Select Instructor. | Image

|
If you have an evaluation linked to your training, the Assessor’s Desk is a great resource. From the Instructor’s Desk, click the “Assessor’s Desk” radio button.
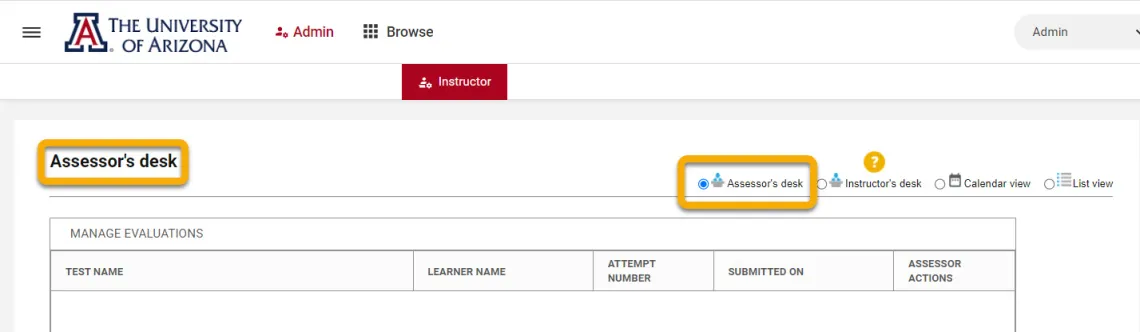
From the Assessor’s Desk, you can:
- View attempts by learners
- Take action on evaluation results
The calendar view offers a convenient layout to visualize your training schedule and is especially useful if you have many classes to manage. From the Instructor’s Desk, click the “Calendar View” radio button.
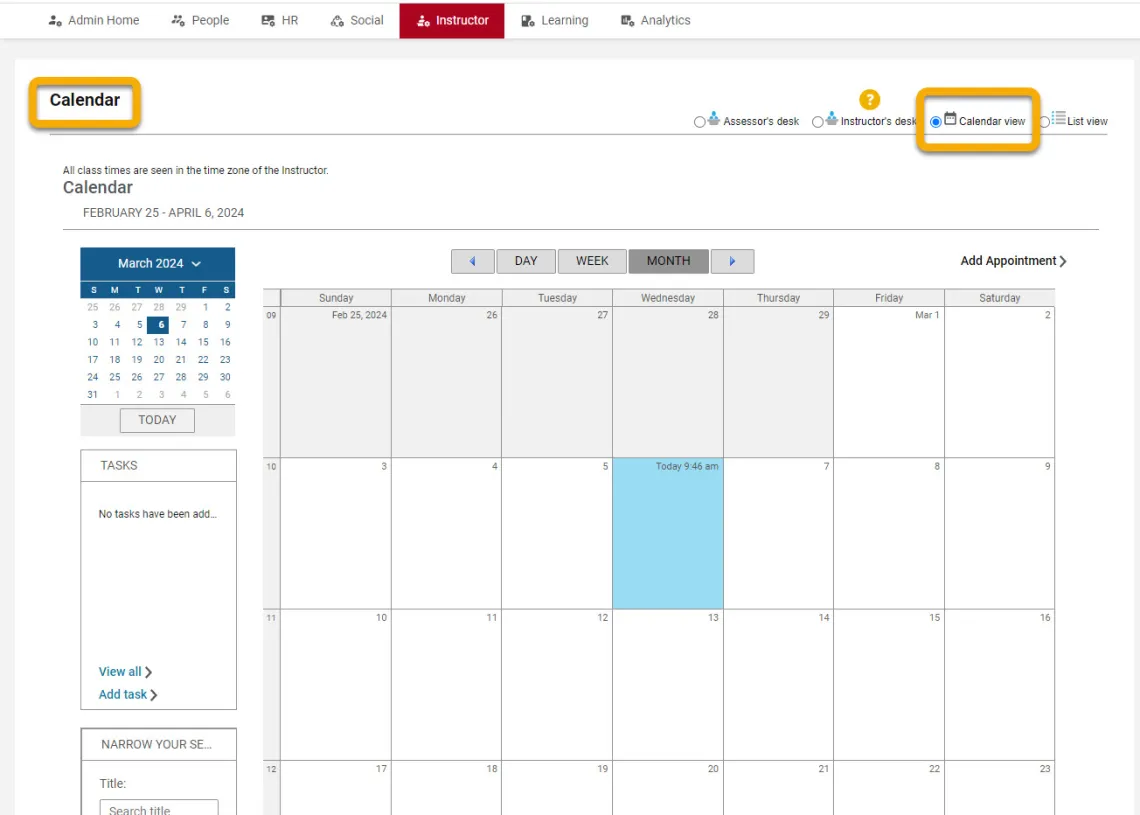
From the Calendar View, you can sort your training schedule by:
- Month
- Week
- Day
- Training Type
Utilize the list view to view previous trainings for which you were the Instructor. From the Instructor’s Desk, click the “List View” radio button.
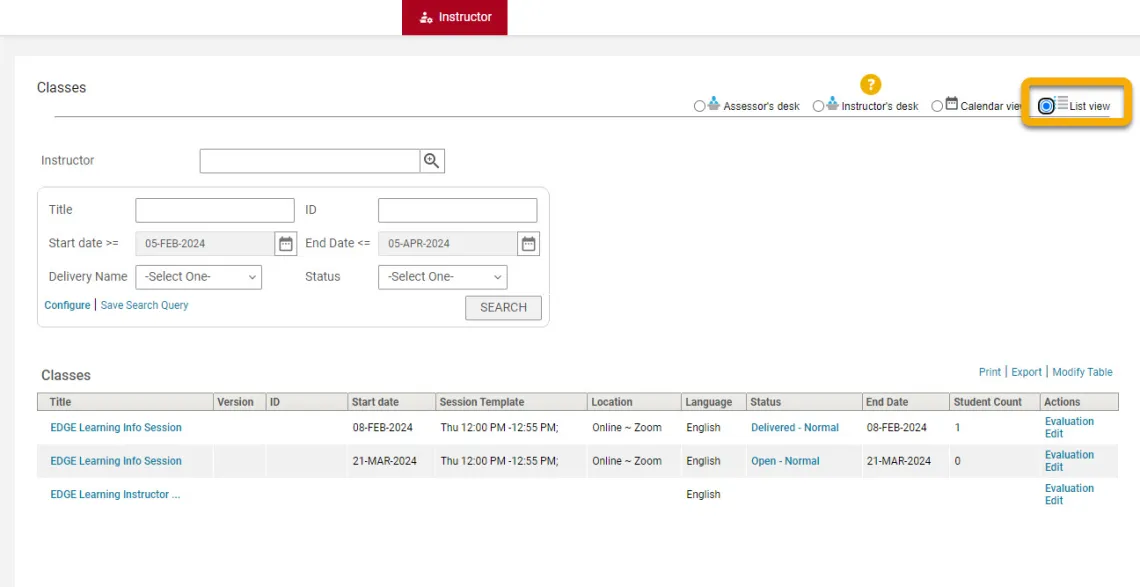
From the List View, you can:
- Sort trainings by date
- Sort by training
- View rosters for delivered classes
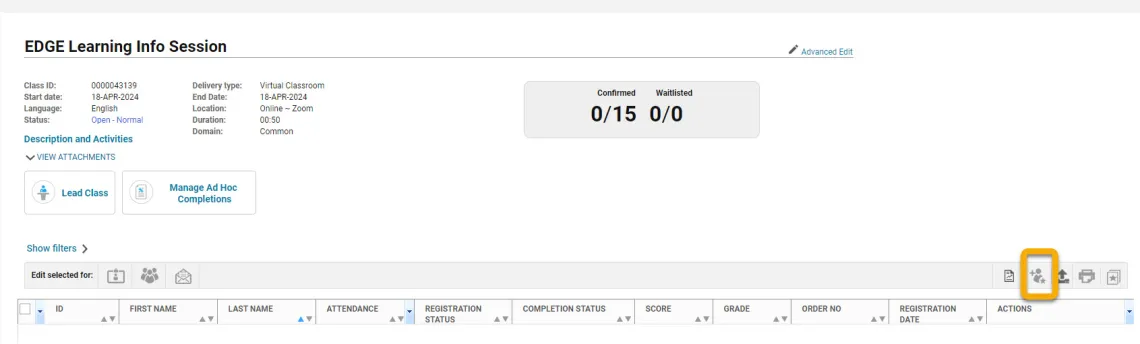
Roster Management and Communicating with your Class
The class roster displays learners who are registered for your training. You can utilize the class roster to add and/or drop learners from your training and, if needed, send email notifications.
To view you class roster:
- Navigate to the Instructor’s Desk.
- From Upcoming Sessions, click the link to the class for which you want to view the roster.
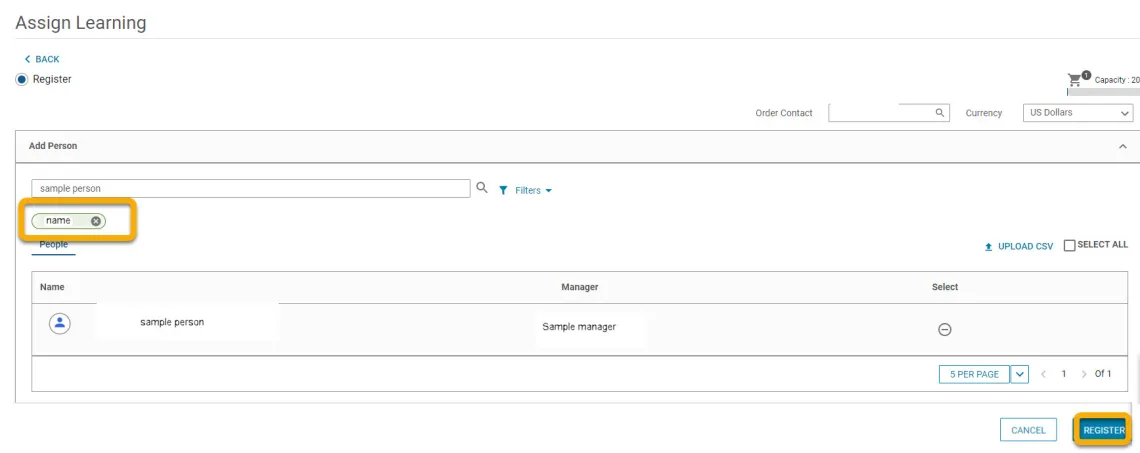
From the class roster:
Step 1: Select Add Learner button
Step 2: Enter the netID or first and last name of the learner you wish to add and click the magnifying glass icon to search.

Step 3: Select the plus (+) icon next to the name of the learner you wish to add. Their name will be added to the registration order, highlighted in green. If you need to add multiple learners, repeat the previous steps.
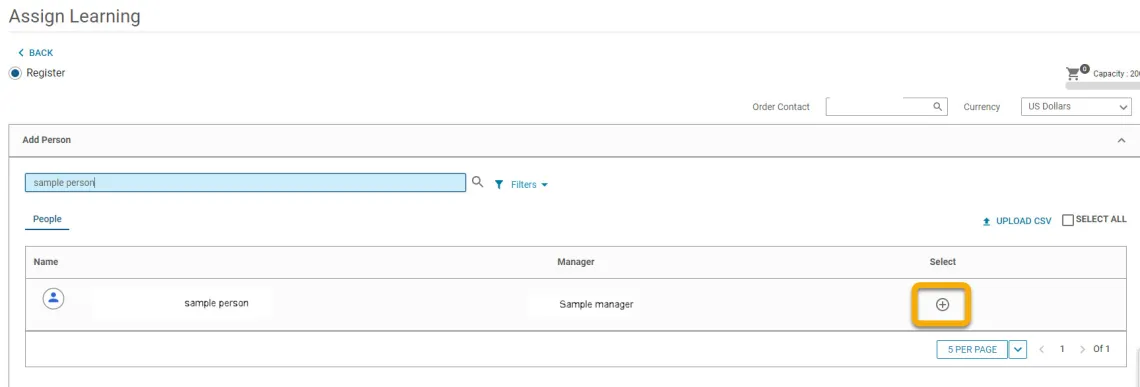
Step 4: Select Register. You will receive a confirmation message that the registration has been completed.
From the class roster:
Step 1: Locate the learner you wish to drop from the class.
Step 2: In the Registration Status Column, select the Registered link

Step 3: From the Update Status dropdown menu, select Drop Registration for these learners or Drop this registration without a late charge. Please Note: Trainings in EDGE Learning DO NOT have late charges associated with them. Selecting this option will not result in a financial charge.
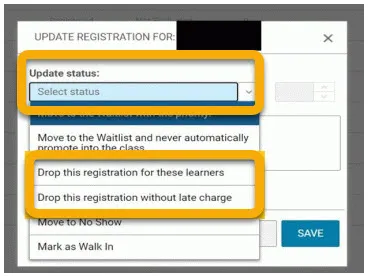
Step 4: Enter a reason for dropping the learner from the class and select Save

Step 5: The learner will receive a system generated email informing them that they have been dropped from the class.
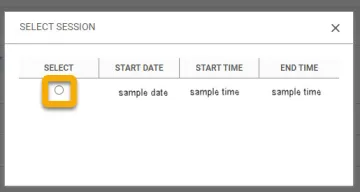
Step 1: Navigate to the class for which you want to print a roster.
Step 2: Click the Printer Icon.
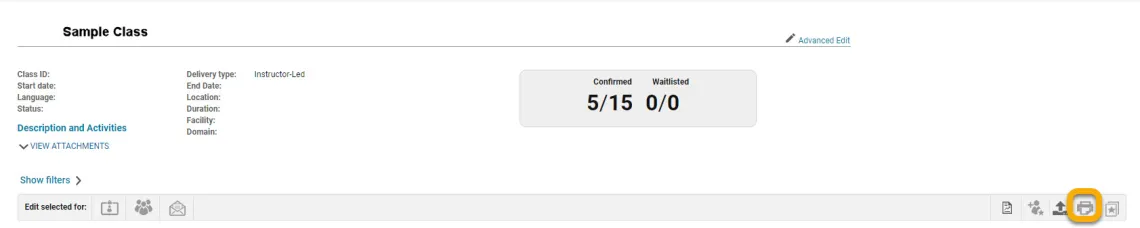
Step 3: In the pop-up window, click the round radio button for the class. A PDF of the class roster will be generated.
If needed, you can communicate with your class roster via email. Some potential instances in which this optional tool might be useful:
- Room/venue instructions or changes
- Materials to bring to class
- Reminder to complete any prework
To send an email notification:
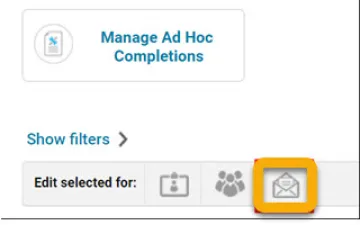
Step 1: Navigate to your class roster
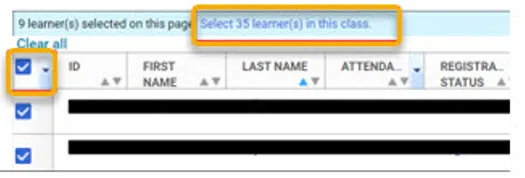
Step 2: Select the learners you wish to email using the check boxes. To select all learners, check the box next to the ID column. If you want to select all learners in the class, and your roster is more than one page long, make sure to click the blue link to select all learners.
Step 3: Select the Send Notification button shaped like an envelope.
Step 4: EDGE will auto-populate the email addresses for the selected learners. Complete the following fields:
- Subject
- Message
Step 5: When ready to send the message, click Send. Selected learners will receive an email from EDGE Learning with your message.
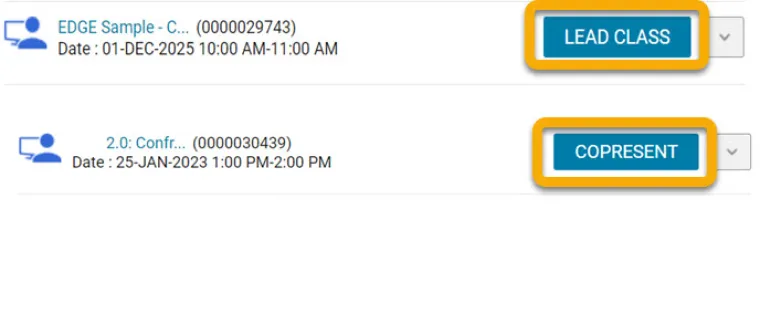
Launch a Virtual Class
If your Learning Administrator has configured your course with the Zoom integration feature, you can launch your class directly from EDGE Learning.
Step 1: Log into EDGE Learning
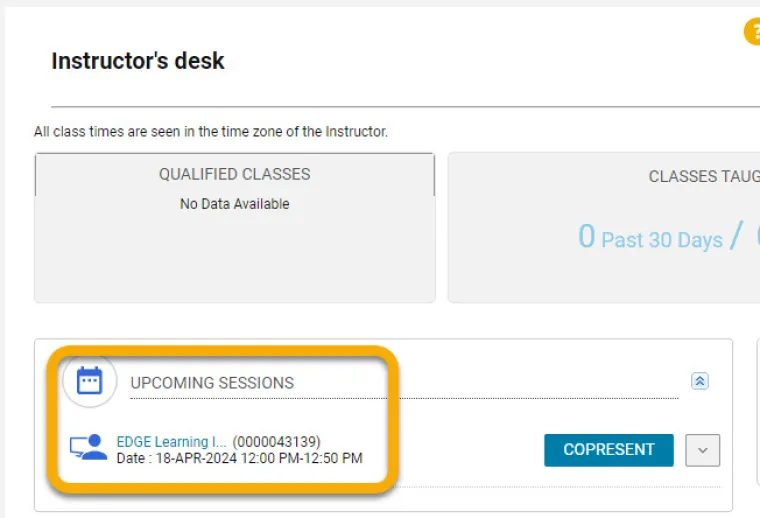
Step 2: Navigate to the Instructor’s Desk
Step 3: From the Upcoming Sessions area, locate the class you want to launch
Step 4: Select Lead Class to start the Zoom meeting. If you are a co-instructor, select the Co-Present button.
Mark Attendance and Mark a Class as Delivered
Once your class is finished, follow these steps, in order, to ensure learners are granted a course completion:
- Update the class roster
- Mark attendance
- Mark the class as delivered
Before recording attendance and marking the class as delivered, update your roster to reflect any no-shows or walk-ins.
To drop a no-show, follow the steps above in the Drop a Learner from a Class section. From the Update Status drop-down menu, select Move to No Show and in the new window, enter a reason (such as, “did not attend”) for the change.
Learners who attended training but were not listed on the roster can be added as walk-ins. Follow the steps above in the Add a Learner to a Class section. Once the learner is registered, click the link in the Registration Status column and from the Update Status drop-down menu, select Mark as Walk In. Enter a reason for the change (such as, “learner was not registered prior to attending class”).
Marking attendance will give a learner credit for attending your class. Once the roster has been updated to reflect no-shows and walk-ins, update the Completion Status of learners on the roster.
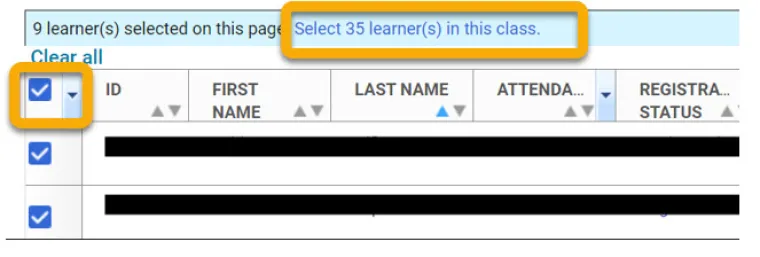
Step 1: From your roster, select the learners you wish to record attendance for using the checkboxes. You can check the box next to the ID Column to select all learners on the roster. If you choose Select All and your roster spans multiple pages, you can click the blue link to select all the learners in the class.
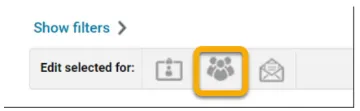
Step 2: Select the Results/Attendance icon.
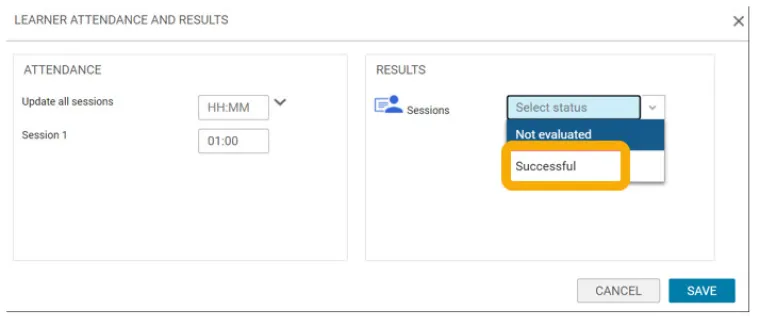
Step 3: In the Results section, open the drop-down menu and select Successful. Then, click Save.
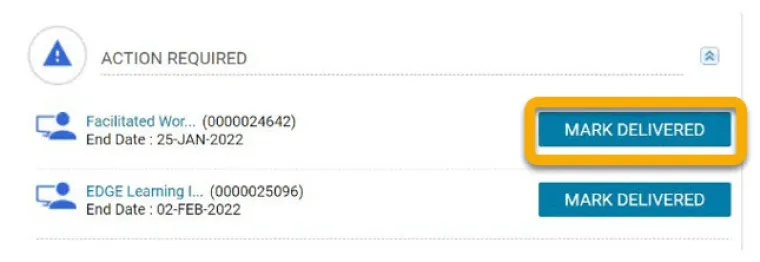
The final step in the Instructor workflow is to mark a class as delivered.
It is critical to update your class roster and record attendance before marking a class as delivered. Ensure that no learners on your roster have a completion status of “Unsuccessful” as this will prevent them from registering for a future session (Cancelled or Suspended statuses are acceptable for learners who did not attend; these statuses will still allow a learner to register for a future session).
Once the class roster is updated and attendance recorded:
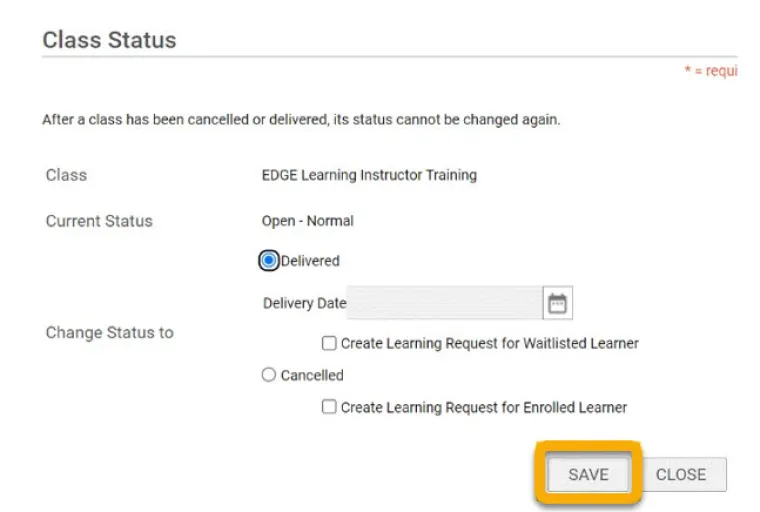
Step 1: Navigate to the Instructor’s Desk and locate the class you need to deliver in the Action Required section. Select Mark Delivered.
Step 2: A new window will open and the class status will default to Delivered. Select Save. The class is now marked as delivered and will no longer appear in the Action Required list.
Questions and Feedback
The EDGE Learning team is here to support you in your role as an EDGE Instructor.
The EDGE Learning team is here to assist! Please reach out to us at edge-learning@arizona.edu.
The EDGE Learning team welcomes the opportunity to learn more about the unique EDGE Instructor training needs of individuals or groups. Please reach out to us at edge-learning@arizona.edu to initiate a discussion of how we can best support your EDGE Instructor training needs.
EDGE Learning Instructors must be provisioned through AccessFlow. If you or someone in your department needs access to the Instructor Role, please contact edge-learning@arizona.edu with the Instructor’s name, netID, and the name or course ID of the training you/they will be facilitating or helping to administer.